Help topics
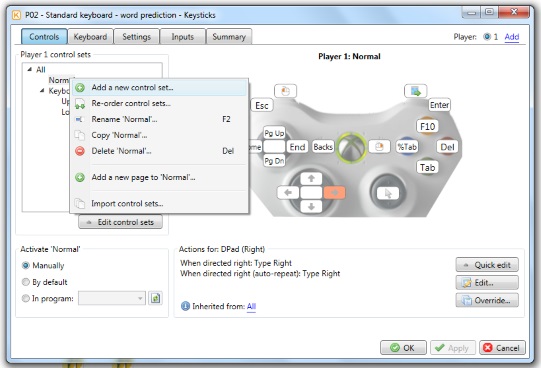
The Controls tab is where you view and edit what the controls do. The controller image shows the controls for the control set selected on the left. When you click a control, a description of the actions assigned to it is shown in the “Actions for” frame at the bottom. You can also hover the mouse over the controls to see a short description of what they do.
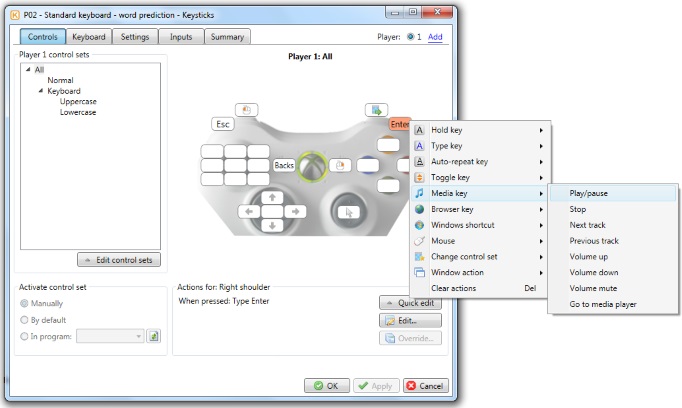
You can quickly assign actions to the controls by right-clicking them and choosing one of the ready-made templates (see picture above). Alternatively, you can use the “Quick edit” button, which does the same thing. If you don’t find what you want on the right-click menu, you can click “Edit” and add your own actions.
There’s also an “Override” button. This is for advanced situations when you have defined some actions in a higher-level control set (e.g. “All”) but you want them to do something different in a lower-level control set.
You can drag and drop to quickly move actions from one control to another. Note that the actions won’t be moved if the destination control has an incompatible type or “directionality” (see Profile Designer – Settings for an explanation of directionality). For example, you can only move a “Control the pointer” action to a stick control with “Continuous” directionality. Take care when moving actions that are “inherited” from a parent control set because moving these will affect all control sets beneath that parent level.
 If you wish to change the controls that are used for navigating and selecting in a keyboard view, use the “Remove keyboard” option in the Keyboard tab and then use “Add a keyboard”, selecting the new controls you want.
Control sets
On the left-hand side, you see a hierarchical view of the control sets for the selected player. Each control set defines one set of controls that can apply to your controller at a given time. By creating multiple control sets and switching between them, you can change the controls dynamically. When you select a control set, you see its controls on the right-hand side.
You can see that the top control set is called “All”. Select this when you want to define controls that stay the same (while the profile is loaded). For example, in this profile (“P02 – Standard keyboard – word prediction”), the left trigger always performs a left mouse-click. Beneath “All”, we see two main control sets, Normal and Keyboard, and the Keyboard control set is further sub-divided into two pages of controls: Uppercase and Lowercase.
Switching control sets
In the above example, the Normal control set defines some general controls for using Windows and the Keyboard control set defines controls for typing using the Keysticks screen keyboard. When you load the profile, Keysticks applies the first control set it finds (Normal). How do we switch to the Keyboard control set when we want to type some text? In general, there are two ways of switching between control sets:
- Using “Change control set” actions

- Using automatic activation rules (see below)
This profile uses the first method. A “Change control set” action is assigned to the right trigger, which allows us to manually switch between the control sets when we want to show or hide the screen keyboard.
Tip: “Change control set” actions have a “Next control set” option. By adding one of these actions to the “All” level in the control set hierarchy, you can switch back and forth between 2 control sets, or cycle through several, with a single control (in this case, pressing the right trigger).
The second method of switching to a control set is to tell Keysticks to activate it automatically whenever you switch to a particular window. For example, you can make Keysticks activate the controls for a game when you activate the game window, without needing to press anything on your controller. You can also specify a “default” control set to switch back to when you leave the game window.
The picture below shows some example settings that automatically apply a control set called “Write an email” on switching to a Mozilla Thunderbird email composition window (the titles of which start with the text “Write:”). On switching out of the window, the default “My controls” control set is activated.
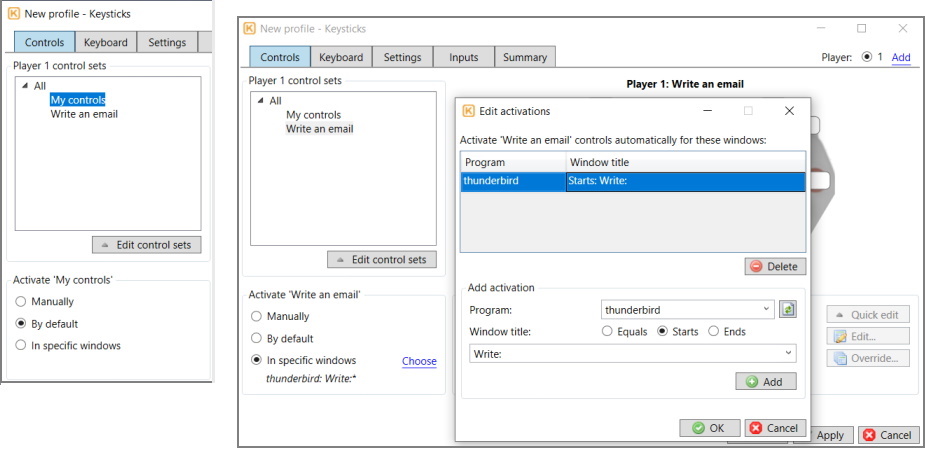
To add an activation rule for a particular game or other application, select the control set containing your controls for it, select the “In specific windows” option in the ‘Activate…’ panel, then select “Choose”. The “Edit activations” window will open, which allows you to add one or more windows that you want the control set to be activated in.
You can specify a program, window title, or both. If you only specify a program, the controls will be applied whenever you switch to any of that program’s windows. As window titles often depend on the current document or context, you can use the “Starts” and “Ends” options to specify how the window title starts or ends. The program / window title drop-down menus help you to choose by showing the programs that are currently running and the windows you have open, however you can also type directly into the program / window title boxes without selecting from the lists. You can use the refresh button to refresh the program / window lists. The program / window title matching is not case sensitive.
After you have added such a rule to activate a control set in a particular window or windows, you usually want to specify another “Default” control set to switch back to when you leave the application window. To do this, select that control set, and choose the “Default” option in the “Activate…” panel.
Programs are identified by their process name. This is often the name of the program’s executable (.exe) file.
Don’t include “*” wildcards in the window title you specify – use the “Starts” and “Ends” options instead.
Note that switching control sets using activation rules is not instantaneous as Keysticks only detects changes in the active window by polling the system every 0.5 seconds. So there will be a delay of up to half a second between the new window becoming active and the control set for it being automatically activated. In most cases, this is not an issue. However, if you need some actions to be performed as soon as a window is activated, the approach to use is to choose a control for switching windows (e.g. controller button) and use the Edit actions window to assign an Activate window action to it, followed by the actions you wish to be performed (which could include a Change control set action).
Editing control sets
You can add, edit, re-order and delete control sets and control set pages by right-clicking them, or by selecting the “Edit control sets” button. You can also import control sets from another player or profile if you want to reuse ones you’ve previously created.
To make Keysticks apply a particular control set when it first loads the profile, right-click it, and use the “Re-order control sets…” option to move it to the top of the control set list.
Note that, in earlier versions of Keysticks, you added keyboard controls at the same time as adding a control set. Now you first add the control set then select ‘Add a keyboard’ on the Keyboard tab. Often, it’s a good idea to create a new control set then add a Keyboard view to that. That way, you can choose when the keyboard window appears by switching control sets, as described above.