Help topics
Keysticks provides some additional features to make typing easier. It includes word prediction, so suggested words appear next to the screen keyboard to save you typing words in full, and it includes some alternative keyboard layouts designed for efficient text entry.
Word prediction controls
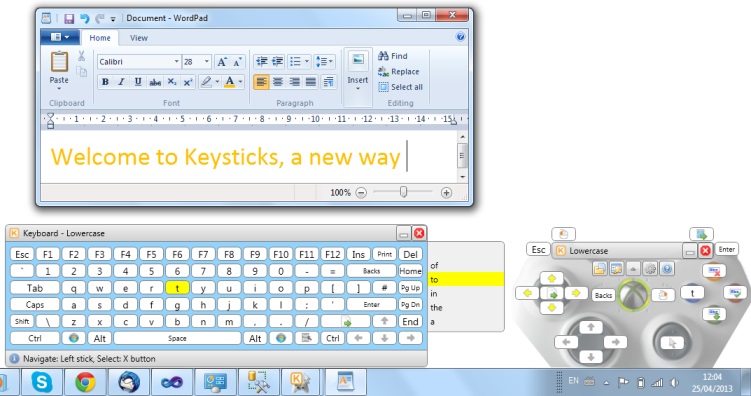
The sample profile “P02 – Standard keyboard – word prediction” provides a standard screen keyboard layout with word prediction controls. The picture below shows how a list of word suggestions appears next to the keyboard and update as you type. The Y and A buttons are used to navigate up and down the list and the B button inserts the selected suggestion. You can also temporarily cancel the word suggestions (when you’re typing a password, for example) using a long press of the Y button, and press B to reenable them.
 If you wish, you can also tell the word prediction engine to add new words that you type to its dictionary in the Program options – Prediction tab.

Alternative keyboards
The square keyboard layouts provide an alternative to the standard “QWERTY” layout. It takes a bit more practice to get used to these layouts, but they offer a number of advantages:
- Faster text entry
- Less screen space taken up
- Word prediction controls can be included in the layout
- Controls can be grouped logically into pages
- A thumbstick can be used for both mouse pointer control and text entry
- Text entry can be performed with a single thumb
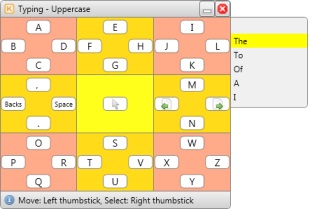
Let’s look at the “Spring grid” keyboard layout used in the profile “P08 – Mouse spring grid – alphabetical – word prediction”. This keyboard enables you to enter text using the left and right thumbsticks. The name “Spring grid” has been used because the selected square springs back to the centre when the left thumb is released.
Here’s how it works: when your left thumb is in the centre, the right thumbstick controls the mouse pointer. However, when you direct your left thumb to one of the 8 directions, then moving the right thumbstick up/down/left/right performs the four actions shown in the highlighted square. For example, Left thumb: Down then Right thumb: Left would type the letter “T”.

 As with the standard keyboard, the ABXY buttons are used to control the word suggestions list, though the picture doesn’t show this. Also, notice the change of colour scheme: you can choose your own colours in the Program options.
The keyboard controls are grouped into a number of pages (Punctuation, Numeric, Navigation etc) as you can see from the profile preview below. You can move between the pages by selecting the  or
or  actions. These actions have auto-repeat enabled i.e. you can hold the control for an extended time to cycle through the pages until you let go (in this case, holding Left thumb: Right then holding Right thumb: Left/Right until the page you want is shown).

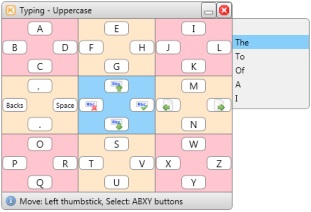
Below is another variation on this keyboard. This time, the actions are selected using the ABXY buttons, and the centre square contains the word prediction controls. This is useful if you want to use the right thumbstick exclusively for mouse pointer control. The other 8 directions perform the same actions as previously (typing keys, navigating pages etc).
This keyboard layout is provided both as a “Spring grid” (profiles P09 and P10), where releasing the left thumb springs back to the centre square, and as a “Step grid” (no spring back, profiles P11 and P12), where directing the left thumb moves the highlighted square one step in that direction. If you find it difficult to hold the thumbsticks in position for any length of time, the Step grid style might be a more comfortable option.

Action strips
Keysticks lets you add “Action strip” keyboards to the profiles you create. These are like a keyboard with a single row of keys, and are useful for typing numbers or function keys (often required in online roleplay games). You can choose how you want to control the action strips:
- 1 button: Holding down the button navigates through the keyboard cells, and releasing it performs the selected action.
- 2 buttons: One button is used to navigate the cells (e.g. hold down to move right, tap to move left) and another to perform the selected action.
- 3 buttons: Two buttons are used to navigate the cells left/right, and a third is used to perform the selected action.
You can also choose whether you want the navigation control(s) to wrap around when the first/last cell is reached. The picture below shows a 3-button action strip for entering numbers and the k and m keys in a game. Here, directing the DPad left/right selects a cell and directing it up types the selected number or letter.

Ok, hopefully you’re now ready to experiment with word prediction and find which type of keyboard you like best. In the next topic, we’ll look at how you can download extra profiles, including the ones mentioned above. In the Profile Designer – Keyboard topic, we’ll also see how you can choose which controls are used to navigate and select items in the keyboard window.
